Git Workflow Summary: A Real-World Journey

Git 工作流程總結:一趟真實的實戰之旅

This is the story of your project, from a local folder to a fully managed GitHub repository.
這是你的專案故事,從一個本機資料夾,到一個功能完整的 GitHub 倉庫。


Phase 1: Project Initialization (Day 1)
第一階段:專案初始化 (第一天)

Goal: Get your local project onto GitHub for the first time.
目標: 首次將你的本機專案放到 GitHub 上。

Visual Overview
視覺化概覽

Local Folder → Git Repository → GitHub Repository
本機資料夾 → Git 倉庫 → GitHub 倉庫
  1. Prepare Your Folder:
    準備你的資料夾:
    You created photo_sorter_v2.py, README.md, and a crucial .gitignore file to exclude personal data and cache files.
    你建立了 photo_sorter_v2.pyREADME.md 和一個關鍵的 .gitignore 檔案,用來排除個人資料和快取檔案。Example .gitignore content:
    範例 .gitignore 內容:

    # Personal data folders
    photos_to_sort/
    people_folders/
    processed.txt
    
    # Python cache
    __pycache__/
    *.pyc
    
    # IDE files
    .vscode/
    .idea/
    
  2. Create a Remote Home:
    建立一個遠端的家:
    You went to GitHub.com and created a new, empty repository.
    你前往 GitHub.com 建立了一個新的、空的倉庫。
    💡 Pro Tip: Don’t initialize with README, .gitignore, or license when you already have local files.
    💡 專業提示: 當你已經有本機檔案時,不要初始化 README、.gitignore 或授權條款。
  3. Initialize Git Locally:
    在本機初始化 Git:
    git init
    將你的專案資料夾變成一個本機 Git 倉庫。
  4. Stage All Your Files:
    暫存所有檔案:
    git add .
    告訴 Git:「我想要將所有檔案都包含在下一個『存檔點』(提交)中。」
  5. Make Your First “Save”:
    進行你的首次「存檔」:
    git commit -m "Initial commit: Add photo sorter v2 with GUI interface"
    建立了你專案歷史中的第一個官方快照(提交)。
  6. Connect Local to Remote:
    將本機與遠端連接:
    git remote add origin https://github.com/yourusername/your-repo.git
    建立了一個名為 origin 的捷徑,指向你的倉庫網址。
  7. Upload Your Project:
    上傳你的專案:
    git push -u origin main
    首次將你的本機 main 分支推送到 origin 遠端。

Phase 2: The First Update & A “Remote Changed” Conflict
第二階段:首次更新與「遠端已變更」的衝突

Goal: Add a new feature and push the update.
目標: 新增一個功能並推送更新。

The Conflict Scenario
衝突情境

Local:  A → B → C (your new commit)
Remote: A → B → D (someone else's commit)
  1. Modify Your Code:
    修改你的程式碼:
    你編輯了你的 Python 腳本。與此同時,GitHub 上的 README.md 也被更改了。
  2. Attempt to Push (and Fail):
    嘗試推送 (但失敗了):
    git push
    你收到了 ! [rejected] (fetch first) 的錯誤。
    Git 正在保護你。GitHub 上有一個你本機還沒有的提交。
  3. The Solution: Sync Before Pushing:
    解決方案:推送前先同步:
    git pull origin main
    它嘗試從 GitHub 下載新的提交,並將其與你的本機工作合併。

Phase 3: Resolving Merge Conflicts
第三階段:解決合併衝突

Goal: Fix the issues that git pull uncovered so you can finally sync.
目標: 修復 git pull 發現的問題,以便你最終可以同步。

Scenario A: The “Uncommitted Changes” Conflict
情境 A:「未提交的變更」衝突

  1. The Problem: git pull 失敗,顯示 Your local changes would be overwritten by merge
  2. Reason: 你在本機修改了 README.md,但還沒有用 git commit 來儲存它。
  3. The Fix: 你先提交了你的本機工作。
    git add README.md
    git commit -m "Update README with new features"
    

Scenario B: The “Content” Conflict
情境 B:「內容」衝突

  1. The Problem: 提交後,再次 git pull,得到 CONFLICT (content): Merge conflict in README.md
  2. Reason: 你和遠端都在同一個檔案的相同幾行上,各自有了一個已提交的變更。
  3. The Fix (The Manual Merge):
    步驟 1:打開 README.md,看到衝突標記,然後編輯檔案使其內容正確。

    <<<<<<< HEAD
    你的本機變更
    =======
    來自 GitHub 的遠端變更
    >>>>>>> commit-hash
    

    步驟 2:git add README.md(告訴 Git 衝突已解決)
    步驟 3:git commit(完成合併,建立一個特別的「合併提交」)

Alternative: Using Git Stash
替代方案:使用 Git Stash

git stash
git pull origin main
git stash pop

Phase 4: The Final, Successful Push
第四階段:最終的成功推送

Goal: Upload your now-perfect local history to GitHub.
目標: 將你現在已臻完美的本機歷史紀錄上傳到 GitHub。

Local:  A → B → C → D → M (merge commit)
Remote: A → B → D
  1. The Final Command:
    git push origin main
  2. The Result: 成功!指令順利執行,因為你的本機歷史紀錄現在已經包含了遠端的歷史紀錄。

Phase 5: Making a Major Change with a Branch (Advanced)
第五階段:使用分支進行重大變更 (進階)

Goal: Replace the GUI with a new spreadsheet-based system without breaking the existing code.
目標: 用一個新的、基於試算表的系統來取代 GUI,同時不破壞現有的程式碼。

Branch Strategy Visualization
分支策略視覺化

main:               A → B → C → D → M ← (merge from feature)
                                 ↗
spreadsheet-sorter:         E → F → G
  1. Ensure You’re on main and Up-to-Date:
    git checkout main
    git pull origin main
    
  2. Create and Switch to a New Branch:
    git checkout -b spreadsheet-sorter
  3. Restructure Your Project:
    你刪除了舊的 GUI 腳本,建立了兩個新的試算表腳本,並更新了 README.md
  4. Commit the Changes to the New Branch:
    git add .
    git commit -m "Feat: Replace GUI with spreadsheet workflow"
    
  5. Push the New Branch to GitHub:
    git push -u origin spreadsheet-sorter
  6. (Optional) Merging Back to main:
    當你對新系統感到滿意時,透過 Pull Request 合併回 main 分支。
    合併後清理:

    git checkout main
    git pull origin main
    git branch -d spreadsheet-sorter
    

Git Rebase vs Merge
Git Rebase 與 Merge 的差異

  • Merge (Default): 建立合併提交,保留分支歷史
  • Rebase: 在目標分支上重新播放提交,建立線性歷史
    git checkout main
    git pull origin main
    git checkout spreadsheet-sorter
    git rebase main
    git checkout main
    git merge spreadsheet-sorter
    

The Core Git Loop
核心 Git 循環

你的所有經驗可以歸結為這個基本的日常工作流程:

Step Command Purpose
1. Pull git pull origin main Always start by syncing with the remote
永遠先從與遠端同步開始
2. Work (edit files) Make your changes, edit your code
進行你的修改,編輯你的程式碼
3. Stage git add . or git add <file> Add your changes
加入你的變更
4. Commit git commit -m "Clear message" Save your work with a clear message
用一則清晰的訊息來儲存你的工作
5. Push git push origin main Share your commits with the remote
將你的提交分享到遠端

Commit Message Best Practices
提交訊息最佳實踐

  • feat: Add subfolder scanning support
  • fix: Handle UTF-8 encoding in progress file
  • docs: Update README with installation guide
  • refactor: Simplify image loading logic

Bad commit messages: update, fix bug, changes


Troubleshooting Common Issues
常見問題排除

  • Issue 1: “Permission denied (publickey)”
    問題 1:「Permission denied (publickey)」
    解決方案:設定 SSH 金鑰或使用個人存取權杖的 HTTPS

    git remote -v
    git remote set-url origin https://github.com/username/repo.git
    
  • Issue 2: “fatal: not a git repository”
    問題 2:「fatal: not a git repository」
    解決方案:確保你在正確的目錄中並且已經執行了 git init
  • Issue 3: Large files causing push failures
    問題 3:大檔案導致推送失敗
    解決方案:使用 .gitignore 排除大檔案或使用 Git LFS

    *.mp4
    *.zip
    large_datasets/
    git lfs track "*.psd"
    git add .gitattributes
    

Advanced Tips for Azure and Cloud Development
Azure 和雲端開發的進階技巧

  • Integration with Azure DevOps
    與 Azure DevOps 整合

    1. Azure Repos:GitHub 的替代方案,具有整合的 CI/CD
    2. Azure Pipelines:當你推送到 main 時自動部署
    3. 分支政策:強制執行程式碼審查和測試
  • Git Hooks for Automation
    用於自動化的 Git Hooks

    #!/bin/sh
    python -m py_compile *.py
    if [ $? -ne 0 ]; then
        echo "Python syntax errors found. Commit aborted."
        exit 1
    fi
    

💡 Comprehensive Guide to Optimize Your Windows 10 PC Performance ⚡️

1. 🖥️ Check System Performance Settings

Run SystemPropertiesPerformance.exe to open Performance Options and adjust visual effects for better speed ⚡️.

2. 🔍 Use Resource Monitor

Run resmon to analyze CPU, Disk, Network, and Memory usage in detail 📊.

3. 📝 List Running Services with PowerShell

Use this command to list currently running services:

Get-Service | Where-Object {$_.Status -eq 'Running'} | Select-Object Name,DisplayName

4. 🚫 Disable Non-Essential Services

Use the following PowerShell script to stop and disable some common non-essential services:


$servicesToDisable = @(
  "AdobeARMservice",
  "Bonjour Service",
  "TeamViewer",
  "DiagTrack"
)

foreach ($svc in $servicesToDisable) {
  if (Get-Service -Name $svc -ErrorAction SilentlyContinue) {
    Stop-Service -Name $svc -Force
    Set-Service -Name $svc -StartupType Disabled
    Write-Output "🛑 Stopped and disabled service: $svc"
  } else {
    Write-Output "ℹ️ Service $svc not found or already stopped."
  }
}
      

5. 🔄 Revert Disabled Services

If you want to re-enable those services later, use this script:


$servicesToEnable = @(
  "AdobeARMservice",
  "Bonjour Service",
  "TeamViewer",
  "DiagTrack"
)

foreach ($svc in $servicesToEnable) {
  if (Get-Service -Name $svc -ErrorAction SilentlyContinue) {
    Set-Service -Name $svc -StartupType Manual
    Start-Service -Name $svc
    Write-Output "✅ Re-enabled and started service: $svc"
  } else {
    Write-Output "⚠️ Service $svc not found."
  }
}
      

6. 💡 Additional Tips

  • 🔄 Keep Windows updated and drivers current.
  • 🧹 Use Disk Cleanup regularly.
  • ⚙️ Limit startup programs via Task Manager.
  • 🛡️ Run antivirus scans routinely.

📌 Summary

With these tools and scripts, you can effectively optimize your PC performance without reinstalling Windows. Remember to create a system restore point before making changes 💾.

🐳 使用 Docker 快速建立 WordPress + phpMyAdmin 開發環境(完整教學)

想要在本機上快速搭建一套 WordPress 測試或開發環境?使用 Docker 是最簡單、最快速的方式!

📁 第一步:建立專案資料夾

打開 PowerShell 或 CMD,執行以下指令:

mkdir wp-docker
cd wp-docker

📄 第二步:建立 docker-compose.yml

內容如下:

services:
  wordpress:
    image: wordpress:latest
    restart: always
    ports:
      - "8000:80"
    environment:
      WORDPRESS_DB_HOST: db
      WORDPRESS_DB_USER: wpuser
      WORDPRESS_DB_PASSWORD: wppass
      WORDPRESS_DB_NAME: wpdb
    volumes:
      - ./wp_data:/var/www/html

  db:
    image: mysql:5.7
    restart: always
    environment:
      MYSQL_DATABASE: wpdb
      MYSQL_USER: wpuser
      MYSQL_PASSWORD: wppass
      MYSQL_ROOT_PASSWORD: rootpass
    volumes:
      - ./db_data:/var/lib/mysql

  phpmyadmin:
    image: phpmyadmin/phpmyadmin
    restart: always
    ports:
      - "8080:80"
    environment:
      PMA_HOST: db
      MYSQL_ROOT_PASSWORD: rootpass

▶️ 第三步:啟動環境

docker-compose up -d

瀏覽 WordPress:[http://localhost:8000](http://localhost:8000)

phpMyAdmin:[http://localhost:8080](http://localhost:8080)

🎉 完成!

你已經成功架設 WordPress 測試站,適合佈景主題與外掛開發。

【教學】EATON C-1000F UPS 警報重置方法(消除電池黃燈閃爍)

您的 EATON C-1000F UPS 是否遇到持續嗶嗶聲警報與前面板電池燈閃爍黃燈的情況?其實這是系統提醒您尚未重置電池狀態。只需幾個簡單步驟,就能自行完成警報重置,讓 UPS 回到正常運作!


🧰 所需工具

  • USB 轉 RS232 轉接線
  • 一台 Windows 電腦或筆電
  • Putty 或其他終端機軟體

🛠️ 操作步驟

1️⃣ 接上轉接線

  • 將 USB 端接上電腦或筆電的 USB 埠。
  • 將 RS232 端插入 UPS 後方的 RS232 通訊埠,直連即可。

2️⃣ 安裝並開啟 Putty

  • 前往 Putty 官方網站 下載並安裝軟體。
  • 啟動 Putty,連線類型選擇「Serial」。

3️⃣ 設定連線參數

  • Serial line(COM Port):請至「裝置管理員」確認轉接線使用的 COM 埠號。
  • Speed(速度):輸入 2400

完成後,點擊「Open」建立連線。

4️⃣ 輸入重置指令

出現終端機視窗後,輸入以下指令QT(大寫)後按 Enter:

QT

5️⃣ 確認重置完成

UPS 面板上的電池指示燈將停止閃爍,嗶聲也會隨即消失,表示重置成功。


🔍 注意事項

  • 若無法連線,請確認:
  • RS232 驅動程式已正確安裝。
  • 選擇正確的 COM 埠。
  • 若系統中有啟用 Winpower UPS 管理軟體,請先關閉,以免干擾通訊。

✅ 結語

透過這個方法,您可以快速自行完成 UPS 警報重置,不必再等待技師或花費額外維修費。簡單、實用,推薦給每位維護設備的 IT 或工程人員試試看!


🧩Excel PivotTable Issue: Old Items Still Show in Filter After Deletion | 樞紐分析表問題:刪除後的舊項目仍顯示於篩選中

Have you ever deleted outdated data from your PivotTable source, only to find that the old values still appear in the filter dropdowns? This happens because Excel caches old items by default — even if they’re no longer present in the data source.

你是否曾經刪除過 PivotTable 的來源資料,但發現舊的數值仍然出現在篩選選單中?這是因為 Excel 預設會保留舊資料的快取,即使這些資料已不在來源中。

✅ Solution 1: Fix It Manually via PivotTable Options

✅ 解法一:透過樞紐分析表選項手動修正

  • Click anywhere inside the PivotTable.
  • Go to the PivotTable Analyze tab (or Options in older Excel versions).
  • Click the Options dropdown → choose PivotTable Options.
  • Go to the Data tab.
  • Set “Number of items to retain per field” to None.
  • Click OK and then Refresh the PivotTable.
  • 點擊任意樞紐分析表內部位置。
  • 切換到 樞紐分析表分析 標籤(舊版 Excel 為 選項)。
  • 點擊 選項 下拉選單 → 選擇 樞紐分析表選項
  • 切換至 資料 分頁。
  • 每個欄位保留的項目數 設為
  • 確定 並重新 更新 樞紐分析表。

✅ Solution 2: Clear Cached Items with VBA

✅ 解法二:使用 VBA 清除快取的舊項目

If you want a faster or automated way to clear old filter items in all PivotTables across your workbook, here’s a VBA method that works beautifully.

如果你希望快速或自動清除整本活頁簿中所有樞紐分析表的舊篩選項目,可以使用以下這段 VBA 程式碼,非常實用。

Sub ClearPivotCaches()
    Dim pc As PivotCache
    For Each pc In ThisWorkbook.PivotCaches
        pc.MissingItemsLimit = xlMissingItemsNone
    Next pc
    ThisWorkbook.RefreshAll
End Sub

💡 To run this code:

💡 執行這段程式碼的方法如下:

  • Press Alt + F11 to open the VBA editor.
  • Click InsertModule.
  • Paste the code above.
  • Press F5 to run it.
  • Close the VBA editor.
  • 按下 Alt + F11 開啟 VBA 編輯器。
  • 點選 插入模組
  • 貼上上述程式碼。
  • F5 執行。
  • 關閉 VBA 編輯器。

This will clear all outdated items from your PivotTable filters and refresh them automatically.

這樣會自動清除所有樞紐分析表中的舊篩選項目,並重新整理。

🛡️ Tip: For future PivotTables, remember to set the “Number of items to retain per field” to “None” when you first create them to avoid this issue.

🛡️ 提示:未來建立新的樞紐分析表時,記得一開始就將「每個欄位保留的項目數」設為「無」,以避免此問題再次發生。

📅 Why You Should Create a Permanent Calendar Table in SQL Server

Creating a permanent calendar table (also known as a date dimension) is a best practice for production systems that involve reporting, scheduling, or time-based analytics. It simplifies logic, improves performance, and makes queries more readable.


🧱 What Is a Calendar Table?

A calendar table is a user-defined table with one row per date and columns for various date-related attributes.

Example Schema

CREATE TABLE dbo.Calendar (
    CalendarDate     DATE PRIMARY KEY,
    Year             INT,
    Month            INT,
    Day              INT,
    Weekday          INT, -- 1=Sunday, 7=Saturday
    DayOfWeekName    VARCHAR(10),
    IsWeekend        BIT,
    IsHoliday        BIT,
    YearMonth        CHAR(6), -- e.g. '202504'
    Quarter          INT,
    DayOfYear        INT,
    WeekOfYear       INT,
    FiscalYear       INT,
    FiscalPeriod     INT
    -- Add more fields as needed
);

✅ Benefits

FeatureBenefit
🧠 ReadabilityEasier to understand and maintain date-related logic
🕵️‍♂️ SimplicityAvoids complex DATEPART or CASE expressions
🚀 PerformancePrecomputed attributes save CPU and memory during query time
📅 FlexibilityAdd columns like fiscal period, holiday flag, ISO week, etc.
📊 BI IntegrationWorks seamlessly with Power BI, SSAS, Tableau, and other tools

🧠 Example Use Case

SELECT 
    c.YearMonth,
    COUNT(*) AS WorkdayCount
FROM dbo.Calendar c
WHERE c.CalendarDate BETWEEN '2024-07-01' AND '2025-06-30'
  AND c.IsWeekend = 0
  AND c.IsHoliday = 0
GROUP BY c.YearMonth
ORDER BY c.YearMonth;

🔧 How to Populate It

Here’s how to generate dates and populate the calendar:

DECLARE @StartDate DATE = '2020-01-01';
DECLARE @EndDate   DATE = '2030-12-31';

WITH DateList AS (
    SELECT @StartDate AS CalendarDate
    UNION ALL
    SELECT DATEADD(DAY, 1, CalendarDate)
    FROM DateList
    WHERE CalendarDate < @EndDate
)
INSERT INTO dbo.Calendar (
    CalendarDate, Year, Month, Day, Weekday, DayOfWeekName,
    IsWeekend, YearMonth, Quarter, DayOfYear, WeekOfYear
)
SELECT 
    CalendarDate,
    YEAR(CalendarDate),
    MONTH(CalendarDate),
    DAY(CalendarDate),
    DATEPART(WEEKDAY, CalendarDate),
    DATENAME(WEEKDAY, CalendarDate),
    CASE WHEN DATENAME(WEEKDAY, CalendarDate) IN ('Saturday', 'Sunday') THEN 1 ELSE 0 END,
    FORMAT(CalendarDate, 'yyyyMM'),
    DATEPART(QUARTER, CalendarDate),
    DATEPART(DAYOFYEAR, CalendarDate),
    DATEPART(WEEK, CalendarDate)
FROM DateList
OPTION (MAXRECURSION 0);

🧩 Add Holiday Info

Assuming you maintain a dbo.Holidays table:

UPDATE c
SET c.IsHoliday = 1
FROM dbo.Calendar c
JOIN dbo.Holidays h ON c.CalendarDate = h.HolidayDate;

🏁 Final Thoughts

Creating and using a permanent calendar table ensures:

  • Better performance
  • Reusable logic
  • Cleaner, more maintainable SQL

💡 Tip: Build it once, use it everywhere!

MS-SQL查詢時產出日曆天暫存Table的方法

🗓️ Two Approaches to Generating Calendar Dates in SQL Server

When working with time-based reporting or scheduling systems, it’s often necessary to generate a list of calendar dates. Whether you’re counting workdays, building timelines, or joining with other datasets, having a calendar table—or generating dates on the fly—is crucial. Let’s explore two popular methods of generating calendar dates in SQL Server.


✅ 1. Using a Recursive CTE (Common Table Expression)

A recursive CTE can dynamically generate a list of dates without relying on any external table:

WITH Calendar AS (
    SELECT CAST('2024-07-01' AS DATE) AS DateValue
    UNION ALL
    SELECT DATEADD(DAY, 1, DateValue)
    FROM Calendar
    WHERE DateValue < '2025-06-30'
)
SELECT * FROM Calendar
OPTION (MAXRECURSION 0);

🔍 Pros:

  • No dependency on system tables.
  • Simple and self-contained.

⚠️ Cons:

  • Slightly less performant for very large ranges.
  • MAXRECURSION default is 100; you must override it for larger date ranges.

✅ 2. Using master.dbo.spt_values (or a numbers/tally table)

This system table contains thousands of rows and can be repurposed to generate sequential numbers (and thus, dates):

SELECT DATEADD(DAY, number, '2024-07-01') AS DateValue
FROM master.dbo.spt_values
WHERE type = 'P'
  AND number BETWEEN 0 AND DATEDIFF(DAY, '2024-07-01', '2025-06-30');

🔍 Pros:

  • Faster performance for large sets.
  • No recursion required.

⚠️ Cons:

  • Relies on an undocumented system table (spt_values), which may be unsupported or unavailable in some SQL Server environments (especially Azure SQL DB).
  • Less self-explanatory for beginners.

🧠 When to Use Which?

Use CaseRecommended Method
Small date ranges (e.g. 1 year)Recursive CTE
Large date ranges (many years)Tally table or spt_values
Need portability and readabilityRecursive CTE
Need performanceTally/spt_values

🏁 Conclusion

Both approaches have their place. The recursive CTE is elegant and portable, great for small to medium needs. If you’re working with large datasets or care about performance, using spt_values (or better, your own numbers table) is a strong alternative.

-- Suggested: Create your own Numbers table for safety
CREATE TABLE dbo.Numbers (n INT PRIMARY KEY);
WITH E1(n) AS (
    SELECT 1 UNION ALL SELECT 1 UNION ALL SELECT 1 UNION ALL SELECT 1
),
E2(n) AS (
    SELECT 1 FROM E1 a CROSS JOIN E1 b  -- 16 rows
),
E4(n) AS (
    SELECT ROW_NUMBER() OVER (ORDER BY (SELECT NULL)) - 1 AS n FROM E2 a CROSS JOIN E2 b
)
INSERT INTO dbo.Numbers(n)
SELECT n FROM E4 WHERE n < 10000;

👉 Tip: For production systems, consider creating a permanent Calendar table with pre-generated dates and useful attributes (week number, holiday flag, etc.) to simplify your queries.

在 Excel 2010 中建立並使用自訂列表進行排序,可用於樞紐分析

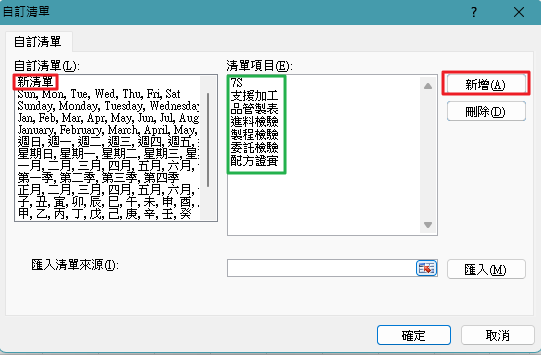
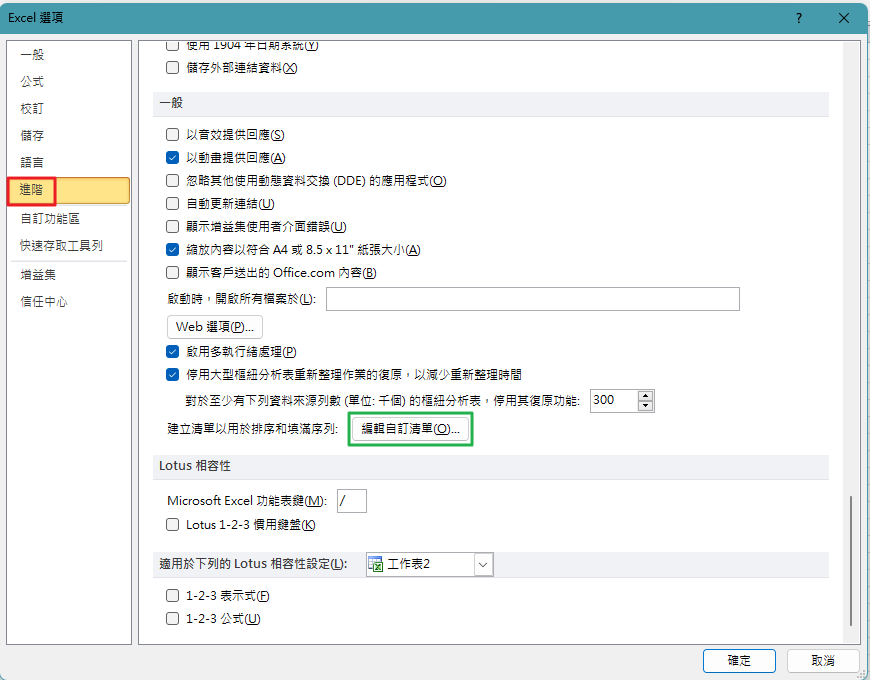
1.點擊檔案=>點擊左側欄的選項=>在 Excel 選項 視窗中,從左側窗格選擇進階=>一般,然後點擊編輯自訂列表按鈕。
在 自訂列表 對話框中:在列表項目」框中,輸入您的自訂順序,每項一行
點擊 新增 以儲存列表。該列表將出現在左側的「自訂列表」框中。
點擊 確定 關閉 自訂列表 對話框,再點擊 確定 退出 Excel 選項。

2.將自訂列表排序應用於樞紐分析表:
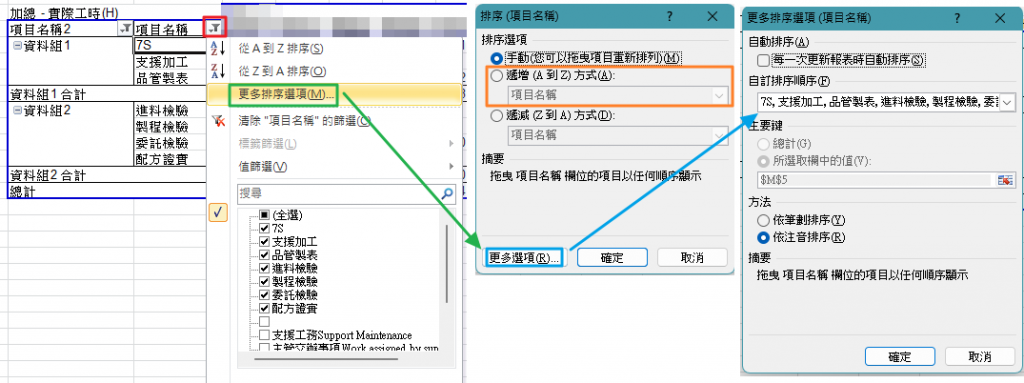
點擊樞紐分析表內的任意位置以啟動它。
點擊樞紐分析表中欄位標籤旁的下拉箭頭。
選擇 排序 > 更多排序選項。在 排序 對話框中:
選擇 升序 (A 到 Z) 或 降序 (Z 到 A)(升序將遵循您的自訂列表順序;降序將反轉它)。
取消勾選「每次更新報表時自動排序」(若已勾選)。
在「第一個鍵排序順序」下,從下拉選單中選擇您的自訂列表。
點擊 確定,然後再次點擊確定以應用排序。

使用Office 2003開啟Office 2007格式的Word、Excel檔案,出現 “轉換程式無法儲存檔案” 訊息

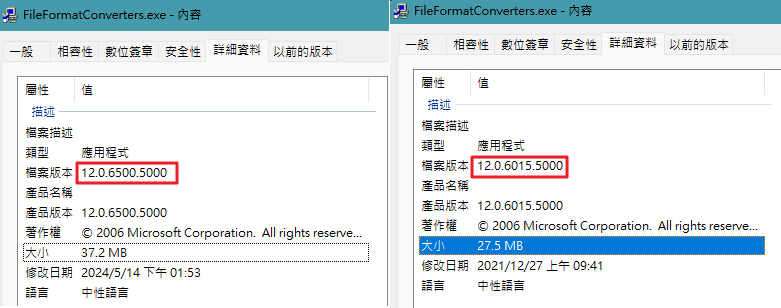
可能是檔案格式相容性套件FileFormatConverters版本較舊,在網路搜尋找到軟體王下載連結。先移除舊版,安裝新版後,可正常開啟。

小版本差異如下圖

EPSON L3210故障燈號三燈閃爍故障排除

1.檢查燈號和印表機狀態 參考EPSON官網異常燈號說明。

2.三燈閃爍判斷非為一般紙張或墨水異常。

3.拆除左側板並掀開掃描模組,檢視異物與破碎紙張。(參考youtube HOW TO REMOVE SCANNER EPSON L3210)

4.以空壓機噴氣清潔內部後,裝回測試正常。